NFC and screen unlocking for mobile devices (part II)

[continued from part I]

Authenticating the tag

Any access control solution whether for physical spaces, local devices or network resources in the cloud has to confront the question of security assurance. What is the level of confidence that the person being granted access is indeed the legitimate user verses an attacker impersonating them? There is no right or wrong answer per se but a spectrum of levels depending on the authentication protocol used. Different protocols exhibit different levels of resistance against common risks.

Threat model

In the case of NFC tags, a reasonable threat model includes:

  • Passive eavesdropping: Listening on the NFC exchange between the legitimate user and a legitimate reader.
  • Skimming: Bumping into the user with a malicious reader to trigger some action against the tag. Note that in this case the attacker must also activate the tag by providing enough power via the reader. By contrast passive eavesdropping assumes there is another reader in range already powering the tag and only requires capturing the RF emanations.
  • Extended physical access:  This can be viewed as an extended version of skimming, where the attacker has possession of the NFC tag for an extended period of time to perform more intrusive attacks, including destructive ones that may involve prying open the chip in an irreversible way.
  • Social engineering: tricking the user into tapping their NFC tag against a malicious reader. This is a variant of skimming where the user is voluntarily performing the tap operation, defeating any shielding mechanism that may exist to deter unauthorized reading.

Choosing a tag

There is a dizzying array of different NFC tags offering a broad spectrum of security and storage options. Within the Mifare family alone there is the original “Classic,” then there is Mifare Plus, DESfire, EV1, Ultralight and Ultralight-C to name a few of the popular offerings. All of them present a sector-oriented data storage mechanism, with available space (ranging from a few dozen bytes to several KB) divided into “sectors.” The wire protocol over NFC defines commands for reading/writing blocks of data into these sectors.

Main differentiating feature between tag types is the access control mechanism they can support around data. In the simplest case such as Ultralight tags, all data on the tag is world-readable and world-writable. Anyone armed with an NFC reader– that includes an Android device these days– can read all data from the tag in a fraction of a second. This may sound like a security vulnerability but it is very often exactly the intended outcome. For example an NFC-enabled poster in a public setting bearing a URL is meant to be readable by anyone in the vicinity. There is no reason to restrict read access.

One step above that is rudimentary access control for making contents read-only. This is an irreversible transition that prevents future updates to data, which is useful in the previous example of tag left unattended in public space. Locking the tag prevents “vandalism” by random strangers overwriting contents with a different URL for example. However it does not help with keeping their contents secret.

More advanced tags such as the Classic and DESfire feature an access control based on cryptography. Instead of being an open book where any sector can be read by anyone, the chip is configured such that the contents of particular sector is only readable given knowledge of an associated secret key. (Strictly speaking there are two keys per sector, one for reading contents and one for writing, as well as changing the keys.) Before a reader can read data out of that sector, it must authenticate to the tag by proving knowledge of the associated secret key.

NFC ring

At the time of writing NFC Ring uses two NTAG203 tags labeled “public” and “private.” While the nomenclature is reminiscent of key pairs in public-key cryptography, the parallel is deceptive. Much like the Mifare Ultralight, NTAG203 provides absolutely no security protection for stored data. They are trivially cloned by reading out all sectors and writing them into another NTAG203 tag. If the user holds up their ring to hostile reader just once (think social engineering– “tap your ring here to earn free iTunes”) or someone bumps them with an NFC reader on the subway, or even passively intercepts 1 exchange between tag and legitimate reader, the attacker has all necessary information required to create a perfect clone.

According to comments from the designer, there is physical protection built into the design to make the private tag more difficult to read. This may combat skimming attacks in the same way that metallic sleeves on US passports prevent them from being read unless the covers are opened. On the other hand it would provide no defense against social-engineering, eavesdropping or physical access risk vectors since the private tag is being deliberately exposed in that scenario.

About the only tricky part is cloning the unique ID or UID assigned to the chip. These four or seven byte identifiers are burnt-in at manufacture time and can not be changed on a chip complying with the specification; effectively they reside on a read-only sector.  That last phrase about compliance however turns out to be the operative part. Already unlicensed Chinese versions of Mifare tags exist where the UID can be overwritten to any arbitrary value. For that matter a dedicated hardware device such as the ProxMark can be programmed to emulate any tag and reply to the reader with arbitrary responses, including a forged value UID.

The final post in this series will look at possible improvements using one of the more advanced tag types.

[continued]

CP

NFC and screen unlocking for mobile devices (part I)

NFC Ring is a crowd-funded project for producing a wearable ring with embedded NFC tags. It is meant to be general-purpose device with a variety of applications, ranging from casual to security critical: exchange contact information, unlock mobile devices or even control physical access to homes and cars, to cite a few example from the KickStarter page. Recent Twitter exchanges motivated this post discussing the nuts-and-bolts of using NFC tags for screen unlocking on mobile devices.

Unlocking with NFC, old-school

In one sense this is old news and already within reach using off-the-shelf components without writing a single line of code or soldering any wires:

  • Windows supports smart card logon for domain-joined machines. Using third-party solutions such as the excellent eIDAuthenticate package allows doing the same for stand alone home PCs.
  • Any credential provider in Windows also works for unlocking the screen. In other words smart cards can be used to unlock a machine that wakes up from hibernation or screen-saver, just as well as they can be used for logging into the OS after a fresh boot.
  • Many smart cards are dual-interface; they can be accessed either by insertion into a wired reader that comes into direct contact with the metal surface or by holding the card against a contactless NFC reader.
  • Recent generation laptops and tablets have integrated NFC readers, eliminating the need for separate smart card reader dangling off to the side. (Proof-of-concept featured earlier: reading smart cards using the NXP PN533 reader tucked under the keyboard rest of HP Envy Spectre laptops.)

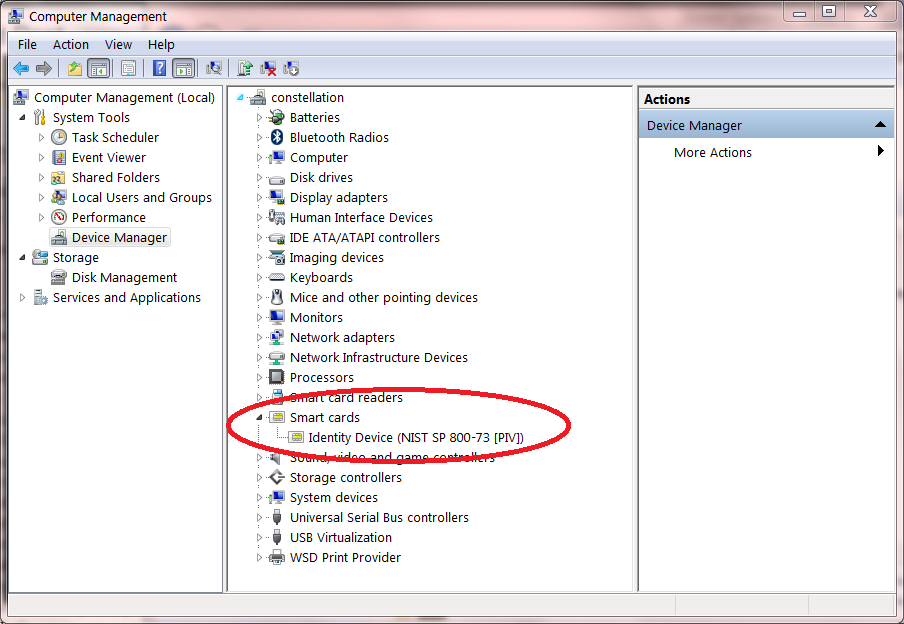
Putting it all together: an NFC smart card unlocks a Windows laptop with integrated NFC reader.

Building for mobile

This is admittedly an outlier as far as “unlocking device with NFC” goes. First most users would interpret that scenario with mobile devices or Android tablets instead of traditional PCs. Windows 8 is trying to make inroads into the tablet market but WinRT sales have been disappointing. (iOS devices are out of the running since Apple has not yet figured out how to incorporate NFC yet.) Second, the NFC-enabled object in mind is often a compact token or tag instead of the vanilla plastic ID card– while this turns out to be a completely superficial distinction since the circuitry inside and RFID technology used are identical, there are fundamental engineering/physics reasons why larger objects are easier to work with. There are three challenges in designing a solution to unlock mobile device with a small NFC tag: tuning the antenna for good connection between tag-device, integrating with device OS to control screen state and crafting an authentication mechanism to verify that only authorized users in possession of the tag can access the device.

Engineering around antenna limits

In simple terms, the NFC ring is nothing more than an ordinary NFC tag in specific form factor. Already NFC tags have been incorporated into an impressive array of ordinary objects:  keychains, refrigerator magnets, business cards, even cup holders. Some options are wearable, such as bracelets used for event ticketing– Outside Lands  pass in 2012 was an NFC tag. The ring design however poses some formidable engineering challenges. First rings are typically made of metal, and having a large metal surface under/above an NFC tag prevents the ability of the tag to draw power from the field. This is typically solved by including a layer of ferrite below the tag, which increases the thickness of the sticker. A good example of this are NFC stickers on San Francisco parking meters, designed to launch the Pay-By-Phone application on compatible devices. Fundamentally this is a well-understood, solvable engineering problem. It involves practical trade-offs between ring dimensions and how much leeway users have in terms of location/distance when trying to use the ring against any given device.

Integrating with operating system

The story gets more complicated and platform dependent when considering the software side of the equation. Windows unlock with NFC works the hard way: that smart card is not merely unlocking the screen, it is performing full logon with public-key credentials. Doing that has side-effects beyond the local machine: for example it may involve talking to the domain controller to refresh Kerberos tickets. That constraints the solution space because NFC object in question must conform to the authentication model defined by Windows, by acting as a “credential” for an installed credential provider in the operating system. (Incidentally eIDAuthenticate used in the proof-of-concept adds that credential provider for stand alone machines. Domain-joined instances already have one for use with Kerberos.) That sounds like a very heavy-weight, over-engineered solution when the problem is framed as “make the screensaver go away.” But it highlights an important point: frequently the credentials used for unlocking the screen also serve other purposes. For example Android derives disk encryption keys from the PIN/pattern/passphrase used to unlock the screen. Unless alternative unlock mechanism via NFC can produce same credentials, it will not be interchangeable. Luckily disk decryption happens only once during boot process. All other times the user-entered code is not implicated in anything other than deciding whether it is safe to unlock the screen.

Managing screen state on Android

Instead of the complex credential providers architecture in Windows, Android has a simple elegant solution in the form of KeyguardManager and its replacement. These classes expose functionality for exiting the screen lock. Applications with the appropriate permission can invoke that API to unlock display based on any criteria, such as the presence of a particular NFC tag. There is a catch: NFC polling loop does not run when the screen is locked. This is in fact a security feature introduced in ICS release, in response to observations about the earlier Gingerbread behavior. In GB tags could be scanned and intents dispatched to application even when the screen was locked. (The screen had to be powered on; there is a different logic that powers off the NFC controller when display goes to sleep.) That made it too easy to have unintended actions happen by placing device in proximity to hostile NFC tags. Imagine web browser navigating to any page or having applications installed just by holding the phone against an appropriate tag.

Arguably ICS went overboard. At least some NFC intents are benign; the operating system could have continued processing NFC tags but suppressing intents unless the target application specifically opted into receiving them with locked screen. In any case that is not what the OS designers opted for, and this behavior can not be overridden by third-party applications. That means any screen unlock app that hopes to run on recent vintage Android has a serious problem because it will not be able to communicate with the magic tag when screen is locked– precisely when that communication is required. Existing applications in Play Store attempt to work around this by replacing the lock screen. But this is not a viable solution because the lock screen itself has useful functionality such as customizable gadgets, notifications and controls for audio player that can not be duplicated by a third-party application. Overcoming the limitation properly requires a change to the NFC stack itself to re-enable the polling loop or otherwise allows tag processing to continue. That option is only available to the OS provider or OEM/carrier making custom modifications to plain Android. That appears to be the path Motorola followed with the new Clip NFC system for MotoX phones.

[continued]

CP

Using cloud services as glorified drive: virtual iSCSI targets (part VI)

[continued from part V]

Since recent vintage Windows Server machines can function as “virtual” iSCSI targets, a storage solution can be built out of any cloud hosting provider such as Amazon EC2 or Windows Azure. Simply request new computing instances running the appropriate Windows server release, then configure the OS with an iSCSI software target accessible from the Internet. This post walks through the steps, assuming remote-desktop connection to the server. (The same work flow can also be automated with PowerShell scripting or using a server management console pointed at the VM instance.)

Broadly speaking, there are two parallel tasks, one for setting up the target and the initiator. These are somewhat intertwined because target configuration requires an identifier for the expected initiator.

Creating an iSCSI target

  • Add the iSCSI target role to Windows Server. Following the pattern started in Server 2008, the operating system has a modular feature set which can be activated on demand, instead of containing the kitchen sink of functionality. This will add a “File and storage services” option to the Server Manager dialog, used in the next series of steps.
  • Select the link to create a new iSCSI virtual target. This will kick start a wizard.

iSCSI_target_disk_setup     iSCSI_name_initiator

  • The first step is creating a virtual disk. That’s right– iSCSI targets in Windows are backed by VHDs. This becomes a case of nested disk virtualization: a virtual machine running Server 2012 and backed by VHD  image– or equivalent format for VMware, Xen etc.– itself will include a virtual disk on its file system. We must go deeper.
  • The dialog will also prompt for the expected ID of initiators connecting to this target. There are multiple ways to identify an initiator, none of them particularly intuitive. Easiest option is to copy paste the iSCSI Qualified Name or IQN style address that is automatically generated by each Windows instance acting as initiator. This name can be obtained from the “Configuration” tab in iSCSI Initiator Properties dialog, which is shown in the screenshots below. (For now skip any additional authentication settings.)
  • Once the target is created, both the virtual disk and the target backed by that disk will appear in the iSCSI node under Server Manager.

iSCSI_target_done   ServerManager_iSCSI_status

Connecting to the iSCSI target

  • Start the iSCSI Initiator application built into Windows 7/8.
  • Easiest way to locate targets is letting Windows perform the discovery work. In the iSCSI Initiator Properties dialog, switch over to the “Discovery” tab and click on “Discover portal” button to specify the network location of the remote VM running Windows Server. This could be an IP address or DNS name. In the example below it is pointing to a local virtual machine addressed in private network space.

Initiator_DiscoveryTab    Initiator_FoundTarget

  • Switching back to the “Targets” tab and if necessary clicking “Refresh” shows the iSCSI targets located at that portal. A single server can offer multiple iSCSI targets; in the above example we only configured one target backed by one virtual disk.
  • Clicking on “Connect” brings up a dialog, with the option to add this target to favorites already opted-in. Leaving that checkbox on is recommended. Windows will attempt to reconnect to these targets after reboots and similar events resulting in disconnect.

ConnectToTarget

  • Finally after clicking OK to confirm the connection… nothing. An observant user may notice the status switched from “inactive” to “connected” but the rest of the system appears unaware of any new storage appearing. No new drives show up in Explorer, not even a notification about removable drive being connected. What happened?  The problem is that VHD created is a blank slate. Not only does it contain no data, it has not even been formatted with a filesystem such as NTFS. Switching over to the Disk Management snap-in (accessible from Computer Management) shows that a new disk has appeared but is listed as “Not initialized.”

UninitializedDisk

  • Fixing that requires a few more steps. These are strictly one-time initialization procedures that permanently setup a file-system structure inside the VHD. They will not have to be performed again when connecting to the iSCSI target in the future. First one is right-clicking and selecting “Initialize disk” from the context menu to initialize the disk. (For this application, choosing GUID partition table over MBR is fine, since the disk can only be accessed by recent vintage Windows instances that support iSCSI anyway.) Second part is creating one or more partitions on the initialized drive. Simplest approach is to allocate the entire space to a single primary partition. Finally the partition is formatted using a file-system such as NTFS.
  • Once the formatting is complete, a new disk will appear in Explorer corresponding to the remote iSCSI target, with the volume name and drive letter assigned in the formatting step. This drive is now usable from any application that can leverage local , which is transparently routed over the network to the remote virtual machine containing the iSCSI target disk.
  • More importantly for our purposes, the mapped disk supports BitLocker-To-Go encryption. Right-clicking on the disk icon will bring up the option to enable BitLocker full volume encryption.

After BL2G is enabled, all data written to the iSCSI target is automatically encrypted. The cloud provider hosting the VM behind that target sees only encrypted blocks being output by BitLocker. This is an important point: even though there is a virtual machine running a fully functional Windows Server operating system to emulate the iSCSI target, the encryption is not done there. BitLocker is not applied at the remote Windows Server VM. Doing so would be futile for protecting against attacks from the service provider. With commodity hardware, cloud platform has full control over the execution of any code inside the VMs it hosts and can subvert any encryption. In this design all cryptography takes place locally on the local user machine. For all the fancy capabilities available in that remote VM running Windows Server, it is only used to store opaque blocks encrypted before they are released to the cloud and only decrypted once they reach the user machine.

[Continued: iSCSI caveats]

CP

Lavabit, Silent Circle and the myth of self-reliance

If one-time presidential candidate Mitt Romney had been a cypherpunk, one can imagine him going on a different type of tone-deaf tirade on individual responsibility:

“47% of Internet users do not use any encryption at all, who are dependent on service providers, who believe these providers have a responsibility to protect their communications. … I’ll never convince them to take responsibility and care for their own privacy.”

There is a certain paradox in all the hand-wringing over Lavabit. After achieving its 15 minutes of fame as Edward Snowden’s email provider, the company shuttered its service very publicly due to unspecified government incursions, achieving notoriety and martyrdom along the way. They were soon followed by the start-up Silent Circle throwing in the towel for their private email service.

That poses one question: since when are users dependent on hosted cloud services to protect their own email? How did a movement predicated on Burning-Man-style radical self-reliance become so dependent on third-party service providers to protect email? It is as if two-decades worth of PGP and S/MIME development had been expunged from history, replaced by a brand new model of communication privacy based on the assumption that users are not capable of anything more complex than clicking web pages. It is worth revisiting that historic context around email encryption, if only to better contrast it with the fashionable web-driven services being hyped today.

End-to-end principle in action

PGP or Pretty Good Privacy started out in the 1990s, with the goal of making strong cryptography “universally” accessible to ordinary users. From the beginning the effort was plagued with regulatory and intellectual-property challenges, coinciding with the first round of cryptowars when technology industry battled the Clinton administration in an effort to relax restrictions around use of cryptography in commercial products. Unique to PGP is a decentralized peer-to-peer trust model. Sending encrypted email depends on knowing that person’s public key. But there is no centralized authority vouching for keys. Instead users vouch for each other, and establish confidence in other keys by navigating paths through already recognized keys. Trust traverses the social network– a remarkable concept, given that it was introduced a full decade before the rise of social networks, which allowed for the first time articulating those connections publicly, rendering them visible for all to see. What followed was community driven adoption, as PGP key-signing  parties started cropping up on the social agenda at IETF meetings and security conferences.

If PGP has been the grass-roots movement for email encryption, boldly fabricating new protocols and formats from scratch with nary a consideration for the patina of standardization, S/MIME is the buttoned-down corporate cousin following a conservative path of incremental change and conforming to existing organizational structures. Starting out a few years after PGP, it leveraged existing building blocks: X509 digital certificates for keys, PKCS for message formatting and MIME for email attachments. More importantly it called for a centralized, hierarchical  trust model where a single universally trusted entity– certificate authority in PKI parlance– mediates between large group of users who may not know each other personally. (Strictly speaking nothing prevents one from using self-signed certificates and manually managing trust with S/MIME. It just happens that most software implementations are not designed to play well with that approach, reflecting a design bias.)

However stark their philosophical differences may have been, PGP or S/MIME were united in one critical design principle: neither had much in the way of demands from infrastructure. Here was a great example of the vaunted end-to-end principle in action. All of the intelligence associated with encryption existed on the user’s own machine. Sure, email clients needed upgrades to recognize and process these new-fangled messages but the disruption ended there. Email servers remained the same– they could continue shuttling messages across the wire, oblivious to which ones were imbued with this magical security property. The network as we know it did not have to change. There was no separate “secure Internet,” “secure DNS” or “secure hosting provider” involved, existing alongside the vanilla Internet. Users did not have to change their ISP or obtain special “encryption-enabled” accounts from specialized providers marketing to niche audiences of the paranoid.

Cryptography goes mainstream?

Granted these early client applications left much to be desired in the way of usability. A seminal paper in usable security from 1999 by Alma Whitten and Doug Tygar was appropriately titled “Why Johnny Can’t Encrypt,” an unflinching look at the difficulties novice users faced in correctly operating PGP.

Fast forward to today. One might hope that the story has gotten better all around: export restrictions around cryptography lifted, interoperable standards codified in RFCs, ubiquitous support in software and polished user experience. Symantec acquired PGP, repackaging it as professionally supported enterprise-grade product. Meanwhile the GNU project implemented freeware clone GNU Privacy Guard. Before long it was ported to all major platforms, complete with user-friendly GUI installers on OS X and Windows. Mozilla ships the email client Thunderbird, providing easy integration with gpg clients. Meanwhile popular websites aimed at enthusiasts offer tutorials on setting up email encryption.

For skeptics who posit that the web-of-trust model for PGP with is hopelessly antiquated and can not scale beyond the rarefied community of high-minded technologists, there is comparable good news in S/MIME. Since 2000 it has been built into Microsoft Outlook and its free version Outlook Express shipping in every copy of Windows. Meanwhile rest of Windows client and server provide plenty of features to simplify roll out in enterprise setting: from issuing the certificates to automatically enrolling users for them, even integrating with smart cards for high-security use cases. All this using nothing but out-of-the-box Microsoft software installed on hundreds of millions of PCs. Surely all that enterprise experience will spill over into consumer use cases at home?

Johnny says: encryption is hard, let’s use web 2.0

A look at the “state-of-the-art” in private communication suggests otherwise. The head of the CIA attempts to use GMail draft messages to hide personal correspondenceMisleading announcements from major companies confuse users into assuming that switching to HTTPS on the web interface is the ultimate fix for email security. Meanwhile only one leading large-scale email provider  attempts to encrypt SMTP traffic in transit, leaving bulk of traffic in the clear when crossing boundaries between different providers. Meanwhile good-intentioned journalists and clueless websites promote a host of flash-in-the-pan services with dubious architecture (and in the case of CryptoCat, impressive catalog of vulnerabilities earning a 2013 Pwnie nomination) dependent on centralized providers in the cloud.

This preference for relying on third-parties “out there” instead of managing cryptographic capabilities locally is not a new development either. Nor are the inevitable disappointments. In the early 2000s, Hushmail was considered the gold standard for safe email communication. The architecture was deemed immune to subversion by the provider itself. With all the key-management logic handled by a Java application delivered from the website each time users visited, no one seemed troubled by the possibility that website may go rogue, turn on its users and serve a backdoored Java applet instead. Until of course that event came to pass, compelled by law enforcement.

Giving up on Bring-Your-Own-Cryptography?

Lost in the public lamenting over forced Lavabit closure is the fundamental question: are these services necessary in the first place? What is preventing the ordinary GMail, Hotmail or Yahoo Mail user from employing strong encryption to communicate with like-minded users? The answer is not “Google does not support encryption.” The web interface built by Google is just one way of using GMail. Users are free to access the same service via rich client applications such as  Outlook or Thunderbird, perfectly capable of grokking S/MIME and PGP with proper configuration. It is an indication of shift in mindset. The original cypherpunk vision made modest demands on infrastructure, calling for bring-your-own-cryptography model. Users made local changes to their installed software and email routine to accommodate existing services. Their intellectual descendants expect the mountain to come to them, in the form of a convenient cloud service accessible from an iPhone, solving all those messy key-management problems, with only the monthly bill to worry about.

CP

Using cloud services as glorified drive: iSCSI targets (part V)

The last post described the limitations of syncing Bitlocker-protected virtual disk images to the cloud. While the design achieves the stated goal of keeping data safe from any prying eyes– including the cloud storage provider– it is not very practical. There is contention between Windows operating system treating the VHD as mounted drive, and local synchronization agent trying to upload that file to the cloud. Note that even if concurrent access could be supported, it would not necessarily help. Because the sync agent does not know when the virtual filesystem completed updates to the disk image, it could end up uploading a corrupted image– similar to what would happen if a USB drive is suddenly yanked out when the machine is still trying to write to it.

iSCSI

What is needed is some way of addressing the virtual disk in the cloud at block level. This is where iSCSI comes in. SCSI stands for Small Computer System Interface, a  popular standard for connecting high-end disk drives since 1980s. iSCSI follows the convention of adding the magical “i” in front of technologies when they are updated for the Internet. While SCSI connections spanned a few inches from a disk drive inside the chassis to the motherboard, iSCSI allows the underlying protocol to run over an IP connection. This allows treating servers halfway around the world as if they were local disks, with low-level access to underlying disks.

That last property is critical since NFS, SMB and many other file sharing protocols exist to present a view of remote storage organized into directories and files. iSCSI operates at a much lower and allows addressing storage at block level. That also happens to be the level where Bitlocker operates. Starting with Windows Server 2008 and Windows 8, it is possible to enable Bitlocker on iSCSI targets as they are called in SCSI terminology. (This is a new development; Windows 7 did not support encryption on iSCSI volumes.)

That suggests a different plan of attack on using cloud services as glorified remote disk, without giving service provider any visibility into our private data:

  1. Place iSCSI volume in the cloud.
  2. Mount that iSCSI target as local drive. This can be done from any machine where we plan to access data
  3. Apply Bitlocker-To-Go full disk encryption with smart card to that drive
  4. Use the locally mapped disk as one would use any other removable storage to store our files
  5. Profit?

Steps #3 and #4 are straightforward, because they work in exactly the same way as previous VHD-based private backup solution. (Both the one-time initialization process to encrypt the volume and subsequent “unlocking” operations to access that data work same way.) So we focus on first two problems unique to iSCSI.

iSCSI targets in the cloud

The first challenge is finding an off-the-shelf service provider that offers storage presented as iSCSI target. This is not surprising. iSCSI is very much an enterprise technology designed to operate inside corporate networks and datacenters. There is no advantage for Dropbox or other consumer-grade services to present their storage across the Internet this way. Second is the problem of OS/device compatibility. As usual Windows leads the way here: both Windows 7 & 8 can access iSCSI targets, by acting as an iSCSI initiator. No such luck with OS X or mobile platforms such as Android. Even enterprise focused cloud storage services such as Box gravitate towards least-common denominator and have little incentive to support niche protocols. There is a plethora of network attached storage (NAS) hardware offerings with iSCSI functionality, but few hosted services with pay-as-you-go model. (Purchasing hardware and getting dedicated hosting does not count as “leveraging existing cloud services.”)

Luckily there is a simpler– but not free– solution based on existing services. In addition to acting as iSCSI client, Windows Server boxes can also function as iSCSI targets. Originally available as separately installed component called MSFT iSCSI Software Target for Server 2008 R2, the feature was later incorporated into Server 2012.

[continued: virtual iSCSI targets]

CP

Using cloud services as glorified drive: roaming & fine-print (part IV)

To recap, here is one plan for using an off-the-shelf cloud storage solution such as MSFT SkyDrive or Google Drive for private data storage, while minimizing any access to personal information by the service provider:

  • Create a virtual hard disk (VHD) image
  • Move the VHD disk image into a directory synced to the cloud backup solution
  • Mount the disk as local drive and format it using NTFS
  • Enable BitLocker-To-Go full disk encryption on the disk, preferably using smart cards to avoid exposing user-chosen passphrases hashes to the cloud
  • Copy/move any files desired for backup into the mounted virtual drive. The contents will be stored encrypted on the virtual disk, which is itself backed by a single massive VHD file.

The cloud provider only receives a single massive VHD file for backup. If they were curious, they could infer that the file is a virtual hard disk, that it is protected by BitLocker and even the protection options such as passphrase verses smart card. But without access to the decryption keys, they would not have visibility into the internal filesystem embedded in the virtual drive. Depending on implementation, they could infer how much of the disk is in use. They can also observe how much data changed between different snapshots of the VHD, which can indirectly hint at filesystem structure. For example if the user is constantly editing one particular file, the sectors on the virtual disk corresponding to that file would change while other areas of the disk remain identical. While the service provider can not determine the contents of those sectors, they can conclude those particular sectors  were modified.

Accessing the data from another computer is easier than the original setup. Assuming the VHD file has been replicated to a local directory compliments of the sync client from the cloud provider, there are two additional steps:

  1. Mount the VHD as local drive
  2. Unlock the BL2G volume by providing necessary credentials for decryption

Because Windows 7 does not natively recognize VHD extension, the first step requires either a visit to the Disk Management console (under Computer Management) or scripting the diskpart utility.
Windows 8 provides a more seamless experience. Not only does it allow mounting VHD with simple double-click but also recognizes BL2G encryption. A desktop notification walks the user through the steps of unlocking the drive:

Win8_notification Win8_BL2G_options  Win8_BL2G_PIN_entry

What is the catch? There are two significant limitations that relegate this experiment to the realm of proof-of-concept:

  • Mounted VHD disk images are locked for exclusive access by the OS. Backup to the cloud can not proceed in the background while the user is still accessing content from that virtual disk. Instead it must be unmounted (using “Eject” from UI, scripting with diskpart or programmatically) to allow synchronization agents to gain read access again.
  • Many cloud storage systems do not support differential backup. The entire VHD image is uploaded to the cloud each time, even when a small percent of the file has changed. This is very likely, since filesystems try to keep different parts of a file clustered together. If the user changes one file on the virtual disk, it will touch sectors associated with that file, along with sectors containing filesystem metadata. But the majority of that disk image is not altered. Yet the inefficiency of uploading the entire file each time means that total size of VHD is constrained by upstream bandwidth.

The second problem is aggravated by the first one, since VHD must be offline and inaccessible until the backup completes. Worse the blackbox nature of the synchronization process makes it difficult to infer when it has completed. That makes automation tricky. In principle we could schedule a periodic task to run when the computer is not in use: detach the virtual disk, wait for cloud backup to complete and reattach it. Even if this could be tolerated– any application that had open files on that volume may behave unpredictable– the problem remains that it is not possible to determine when backup is finished, short of low-level hacks such as monitoring the open file handles in the sync client process for references to the VHD.

In a follow-up post, we will look at an alternative approach that allows for incremental backup, with security still provided by BL2G full-disk encryption.

CP

Using cloud services as glorified drive: BitLocker-To-Go (part III)

The second post in this series described how to map storage at an arbitrary cloud storage provider as an ordinary local drive in Windows, using virtual hard disks. This post will look at how to encrypt that drive such that any information data backed up to the cloud remains private under the worst-case scenario: the service provider going rogue and deciding to rifle through user data. While there are many ways to encrypt storage locally, we are primarily interested in options supported out-of-the-box on common operating systems such as Windows. It turns out that there is a built-in feature with exactly the right properties for this job: BitLocker-To-Go disk encryption or BL2G for short.

BitLocker and BitLocker-To-Go

Some context is required to distinguish BL2G from its better known cousin, BitLocker for boot volumes. There is plenty in common as the shared branding suggests. Both variants are full-disk encryption schemes; they operate at the level of an entire drive. This is contrast with a much older Windows feature called Encrypting File System, which operates at the level of files and directories. With EFS it is possible to designate particular directories or even individual files for encryption. For BitLocker that choice is made at the granularity level of a complete drive. (Strictly speaking these are logical drives, rather than physical instances. A single physical drive may be formatted with multiple partitions, each appearing as independent logical volumes.)

Both vanilla BitLocker and BL2G use similar formats and cryptographic primitives such as AES block cipher. Where they differ is the way encryption keys are derived, a difference rooted in the usage scenarios. Ordinary BitLocker protects boot volumes and is often used in conjunction with a built-in TPM that is part of that machine. One interesting corollary is that BitLocker can not encrypt everything. At least part of the boot-loader and core filesystem code responsible for decrypting the rest of the drive must be accessible in the clear. This poses a problem, since an attacker could then replace these pieces with a malicious bootloader/OS combination to obtain the. To thwart such attacks, BitLocker requires a verified boot process, where disk encryption keys are derived as a function of the code executed during the boot sequence. If any of those pieces change– such as the OS bootloader– TPM will generate different keys and disk can not be encrypted. Implicit in this design is the assumption that decryption only needs to happen locally. There is no expectation that the same drive can be removed from that laptop, popped into a different one– which contains a different TPM– and successfully decrypted on that new host.

BitLocker-To-Go is specifically aimed at solving that mobility scenario. While internal drives are rarely migrated between machines, USB thumb-drives are frequently used as low-tech high-latency network to carry data around. Unfortunately their size and mobility also makes them frequent subjects of theft or accidental loss. This is where BL2G comes in, providing full-disk encryption on removable media. In many ways BL2G has a simpler design because there is no boot sequence to worry about. On the other hand the mobility requirement rules out using an on-board TPM as the source of encryption keys, since TPM is bound to a single machine by design.

Encryption options

Instead BL2G gives users the option of a passphrase or smart cards. Ordinary BitLocker can also work with passphrases in the absence of a TPM but that leads to a situation where the burden is placed on users to pick “good” passwords. The difficulty of recovering the key is a function of user’s ability to pick random sequences of letters. This is exactly the weakness in SpiderOak client-side encryption described earlier. The same problem plagues OS X FileVault design, since Apple never quite figured out how to incorporate TPMs into their hardware. (Making matters worse FileVault uses the same secret for disk encryption as login to the OS. That means the secret will be typed often, for unlocking the screen for example, further discouraging choice of high-entropy ones.)

On Windows the smart card option is only available for BL2G. This is because the operating system is fully booted and running with all bells and whistles. By contrast ordinary BitLocker decryption takes place early on in the boot sequence, before smart card functionality has been initialized. Using this option requires a suitable “card” and/or reader combination but the options are quite diverse. Most common are plastic cards requiring insertion into a card reader, but contactless cards using NFC, USB tokens with embedded card or even an Android phone with embedded secure element can function as smart card as far as Windows is concerned. To confuse matters, starting in Windows 8 it is also possible to create a virtual smart card out of the TPM but doing that would break roaming.

One catch is that BL2G can not be applied to any old drive. For example SMB network shares can not be encrypted this way because such shares are not addressed as raw devices at the block level. Access to network drives is mediated by a remote server which presents a high-level abstraction of a file system, instead of a physical storage medium divided up into sectors. By contrast when a flash drive is attached, the OS takes direct control over its filesystem and manipulates the underlying media directly.

Enabling BitLocker-To-Go

Luckily VHD file mounted as local drive looks very much like that removable USB drive as far as the operating system is concerned. BL2G is enabled in exactly the same way: right-clicking on the mounted VHD image shows a context menu with the option to turn on BitLocker:

Manage_Bitlocker_menu

Enabling BitLocker-To-Go

As the shield icon suggests, the command requires administrator privileges. Selecting that and confirming the UAC prompt leads to a wizard walking the user through the steps of encrypting the drive and backing up the encryption key:

EnableBitlocker BackupRecoveryKey ReadyToEncrypt

When the smart card option is selected, the wizard will require that a card is already inserted in the reader and search for a certificate with suitable properties. After encryption is complete, the drive icon changes to show a gray open padlock superimposed. This signals that the volume is protected by BL2G and that it is currently unlocked to allow access to the data.

AfterEncryption

Once BL2G encryption is complete, all data written to the virtual disk– which is represented by a single VHD file as far as the cloud service goes– is protected. There is no user chosen passphrase that can be brute-forced. (There is a usually a PIN set on the card for additional security but this PIN is only known to the card; it is never part of the encrypted disk image or shared with the cloud.)

The next post in the series will look at the experience of accessing that data from another machine, and some important limitations of this approach which make it impractical for large volumes.

CP

JavaCard, Global Platform and SIM vulnerabilities

Security researcher Karsten Nohl recently announced discovery of vulnerabilities in SIM cards, to be presented at the upcoming BlackHat conference. Since exact details of the problem are scant, this post will cover background material on smart cards– which SIM is a special case– and their management model. Nohl’s summary hints at the existence of two independent problems:

  • A cryptographic key used for provisioning code to the SIM card can be brute-forced. Recovering the key allows installing new applications.
  • Implementation error in the smartcard operating system running inside the SIM card, which allowed one application to access data belonging to another one.

The first problem is nominally the realm of Global Platform. GP is a standard dating back to the 1990s for describing how to carry out content management operations on a smart card. (Here we will use “smart card” in generic sense of a tamper-resistant execution environment regardless of its form factor. By this definition plastic cards used for chip & PIN, electronic passports, smaller SIM cards used in mobile phones to connect to the cellular network, embedded secure elements featured in certain Android phones, USB tokens etc. all feature a “card” environment inside.) Content management includes installing/deleting applications, creating new security domains– roughly corresponding to notion of user accounts on a desktop operating system– as well as assigning cryptographic keys and privileges for these domains. Unlike commodity desktop OSes, card platforms are inherently locked down: these operations are only allowed to well-defined roles such as “card issuer.” The end-user holding the card rarely has that power. Instead a centralized service called “trusted services manager” or TSM has possession of cryptographic keys used to authenticate to the card OS and carry out these privileged operations. GP defines a secure messaging protocol, prescribing the protocol for establishing an authenticated channel, and laying out the format for how individual messages addressed to the card are authenticated and encrypted. GP also has a notion of a card manager application, which performs a role akin to a software installer. Typically the TSM authenticates to the card manager using the issuer-security domain or ISD keys, informally known as card manager keys and uploads new application code over the secure channel. Until GP2.2 the card manager was the only way to install new code. GP2.2 introduced the notion supplementary security domains with privilege for managing code on the card.

How strong is the secure messaging protocol? The answer is, it depends on the choice of parameters. GP defines many options when it comes to the choice of cryptographic primitives. Most of them are based on symmetric keys, with TSM and card sharing a secret, typically unique for each card– so-called “diversified” set up because each card has different keys, avoiding a single global secret across the system. This is a historical artifact of public-key cryptography not being fast enough on the early generation of hardware, since smart cards are highly constrained in terms of power, CPU speed and memory. Cards used in payment applications typically support 2TDEA, which is to say triple-DES with two independent keys, with first and third key being equal. (Only specifying two keys and leaving the third constant would not work because it is vulnerable to a meet-in-the-middle attack.) For example 2TDEA is used for over-the-air provisioning of applets to the Android secure element when Google Wallet is set up. Latest amendments to the GP spec also introduced the option for using AES.

SIM cards however support an alternative way to install applications, using the SIM Application Toolkit. This is a standard only relevant to wireless carriers, independent of Global Platform.  Judging by reports it was this application using a single DES key for authenticating code installation rather than the card manager.

Assume that we recovered the card manager keys– while in this case it sounds like the attack did not accomplish that, we will conservatively look at the worst-case scenario. Now what? It’s tempting to conclude that it is game over. But the GP specification is a bit more nuanced than “ISD equals root.” In fact there is no concept of an all-powerful root or administrator role in cards compliant with GP. Here are examples of things that TSM can not do, even with complete control over card manager keys:

  • Read/write raw EEPROM, Flash or other persistent storage of the card
  • Recover private data belonging to an existing application
  • Upgrade the code for an existing application. In fact GP has no notion of in-place upgrade. An application can be deleted and reinstalled but that will lose all existing data associated with that instance. There is no way to “backdoor” an already installed application with a malicious version without losing all instance data.
  • Read out the cryptographic keys associated with any other security domain– TSM can overwrite them to take over any other supplementary security domain, but not learn the previous keys.
  • Attach debugger or other diagnostic schemes to existing applications; GP has no such concept either.
  • Recover the binary for an existing applications. Surprisingly even reading out the executable code is not possible after the application is installed.

This presents the attacker with a dilemma. We have a SIM card with previous installed application– the GSM applet– which contains valuable cryptographic secrets used to authenticate to the carrier network. (Just to be clear: the GSM key has nothing to do with Global Platform. It is used for obtaining cell phone service by proving identity of the subscriber to the base-station.) Even with ISD keys we can not scrape that secret out directly. But we are able to install other applications on the card. What can those applications do?

Global Platform is silent on this point. That is up to the underlying card environment. That brings us to the second vulnerability hinted in Nohl’s summary. JavaCard is a common standard for programming smart cards, running a highly restricted set of Java. Not all cards are JC-based, but it is popular enough that many SIM products utilize this platform. JavaCard in principle has a very clean model for supporting multiple, isolated applets running side-by-side on the same virtual machine. (This is unlike the model used for running Java on a commodity OS, where each application typically runs in its own process with its own instance of JVM. Due to the resource constraints of card environments, there is just one VM.) Short version is that all applets are isolated from each other, and the only way to communicate is by going through an explicit “sharable interface” mechanism to make RPC-style calls from one applet to another. Outside that mechanism, it is not possible for one applet to reach-in and read out data associated with another applet in the same VM.

At least that is the theory. In principle the virtual machine implementations running on card environments have much weaker validation rules compared to their full-fledged desktop incarnations. For example, the applet installation process for JavaCard includes an off-card validation step:

From Oracle, http://www.oracle.com/technetwork/java/javacard/javacard2-138597.html

From Oracle, JavaCard framework description

At this point, alarm bells should go off. The whole point of Java is that it promises sandboxing for code, in ways that native execution environments can not easily provide without great overhead. Yet the JVM on the card is relying on some external validation of bytecode to guarantee those properties? What happens if someone decides to “skip” that off-card validation step and install deliberately corrupted bytecode?

That we will find out at BlackHat this year.

CP
Using cloud services as glorified drive: virtual disks (part II)

The preceding post looked at a naïve approach for combining local file encryption using EFS with cloud storage, explaining why that mixture does not accomplish the intended objective. Here we look at an alternative design that does work as expected. There are three ingredients:

  1. Virtual disk images (also known as VHD files, after the extension used by MSFT virtualization software for this type of image)
  2. BitLocker-To-Go full volume encryption (“BL2G”)
  3. Any remote storage/backup system that relies on syncing a local folder to the cloud. For these examples we will use MSFT SkyDrive, but the same approach works for DropBox, Google Drive or any other service patterned on keeping a local folder synchronized

“All problems in computer science can be solved by adding one more layer of indirection” goes one popular CS aphorism. Virtualization happens to be one of the more broadly applicable ways of adding indirection. Virtual disk files are typically used to represent images for virtual machines. In this case, they solve a slightly different problem of bridging abstraction levels. The encryption scheme we plan to use operates on entire drives. Meanwhile cloud storage solutions typically work at the level of folders and files.  There are many ways to make a directory appear as a full disk drive– for example sharing the folder and then making a loopback connection to that network share will mount it as a drive. But that approach will present the “disk” in the wrong representation, as a remote SMB share not directly controlled by the local OS. By contrast BL2G requires disks directly addressable at block level.

This is where the ability to mount VHDs as removable drives comes in handy. In effect what looks like a single file to the cloud synchronization software appears as a removable drive to the operating system, much like a USB thumb drive that can be connected and disconnected at will. Better yet, Windows BL2G encryption feature is directly applicable to this type of disk. (For completeness: VMware also has a comparable VMDK format for disk images. However manipulating these requires additional software installation while VHD is natively supported out of the box.)

Creating the disk image

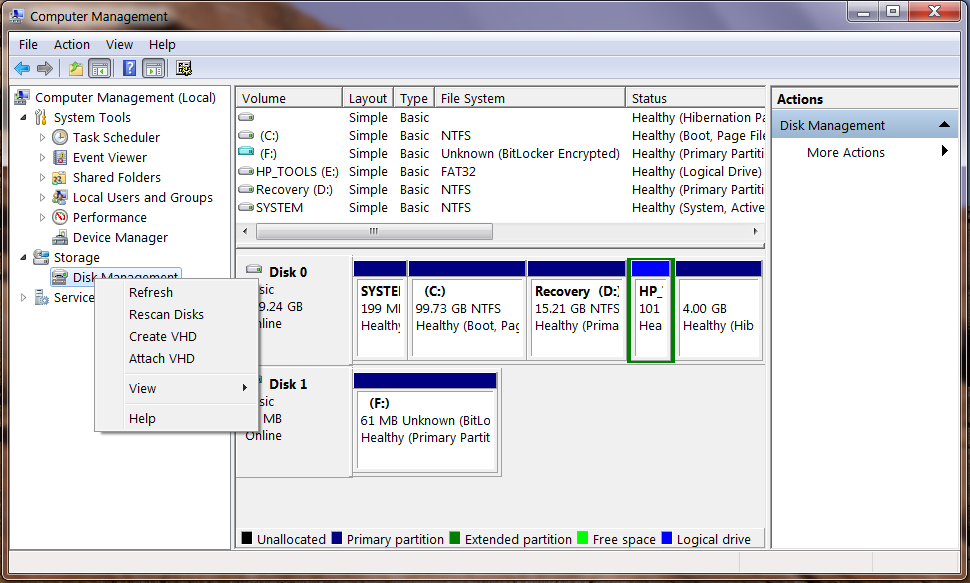
The first step then is creating the VHD. There are different ways of doing this based on the operating system version. For Windows 7, one needs the Storage Manager snap-in. This can be either added to any MMC console, or it can be accessed directly by right-clicking on “Computer” and choosing the Manage option. Right-clicking on storage manager brings up a context menu with the option to create a new VHD:

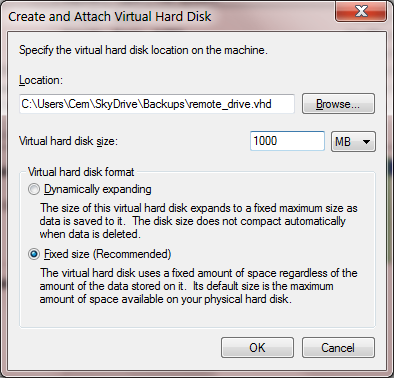
CreateVHD_ComputerManagement      CreateVirtualDisk_details

While the location of the VHD file is not important,  it helps to choose a modest size due to limitations of the synchronization process that will be discussed in greater detail later. After the file is created, the virtual disk has to be initialized and formatted, as described in this tutorial. These steps only need to be performed once. Once the VHD image is initialized with a file system, it can be mounted/unmounted multiple times.

Mounting the disk image

The other half of the puzzle is mounting an existing VHD which has been downloaded from the cloud. In other words, we want to get to a point where Windows views that file as an ordinary disk drive with a letter assigned such as R. In that state we can browse into that folder in Explorer and drag-and-drop files for cloud storage. In Windows 8 this is as simple as double-clicking the VHD file. Windows 7 requires more work, as the file extension is not recognized natively. Going back to the Disk Manager snap-in, the same context menu for creating new VHD images also has an option to attach existing ones, as illustrated in the above screenshot.

(In a more polished flow, these steps could be automated with diskpart utility present in Windows out-of-the-box. It is possible to write scripts that automatically mount and unmount the VHD compatible with either OS, and even associating that for handling the extension.)

With the VHD mounted as disk drive, it is now possible to open that drive in Explorer and move any files there. But doing so would result in those files getting backed up to the cloud provider as cleartext without encryption. Since our objective is to protect data from mishaps associated with the cloud provider, BL2G must be enabled first before using the virtual disk.

[continued]

CP

Using cloud storage as glorified drive: dead ends (part I)

Revisiting the ideal layered model for encrypted cloud backups from the previous post:

  • Encrypt user data with keys managed directly by the user, and not available to any third-party
  • Upload the resulting ciphertext after encryption to the cloud

Many solutions exists for the first part of the problem, which makes it a natural question to ask if they can be used without modification with a standard cloud storage offering to protect data from any mishaps in the cloud. In other words, the goal is to use the cloud as a glorified disk drive storing opaque bits, with no ability to peer into the meaning of those bits or perform any intelligent manipulation on them in the name of “adding value.”

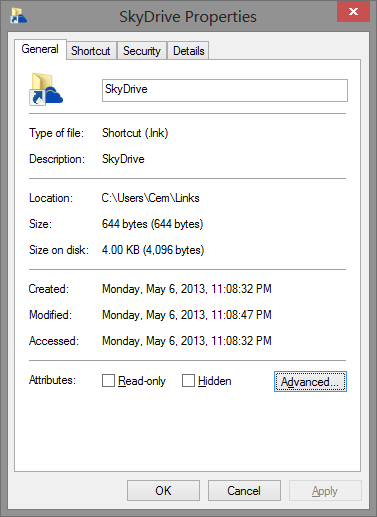
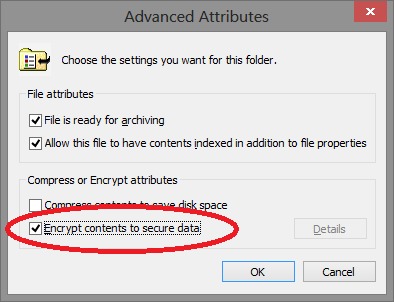
First point is that this composition is not always straightforward. Many obvious combinations do not work, due to the mismatch in the level where cloud backup systems operate and the level local data encryption is typically applied. To take on example of how things fail: Encrypted File System or EFS has been a feature of Windows since the W2K release. EFS operates at the filesystem level as part of NTFS, allowing entire directories or even individual files to be encrypted. Fortunately  many popular cloud storage systems such as Google Drive, Windows Sky Drive and Drop Box also present themselves as a local folder where files can be drag/dropped. A first attempt than might be enabling EFS on that folder, on the assumption that will result in encrypting the underlying content and keeping it safe from prying eyes on the cloud provider side. Enabling EFS is simple enough, via the advanced properties for any directory:

SkyDrive_properties       EFS_AdvancedProperties

This may look straightforward but it does not accomplish the intended effect of keeping the original data invisible to the cloud provider. To see why, we need a few facts about the way these cloud storage services usually operate. Typically there is a background process which we can call the synchronization agent, although they are often not implemented as a proper Windows service as one might expect. That agent is responsible for monitoring a set of local directories for changes, as well as listening to notifications from the cloud provider about availability of new content in the cloud. When the operating system informs the agent that a local file has changed, that agent kicks into action and uploads latest version of the modified file to the cloud. In the other direction, when the cloud provider sends a notification to the agent that there is a more recent version of the file available in the cloud, it is downloaded and dropped into the local folder.

The reason this does not interact as expected with EFS encryption is that the latter operates at a very low level, transparent to the I/O capabilities used by agents. Synchronization takes place under the same user account as the person who owns the EFS-protected directory containing confidential information. When that process attempts to open some file for reading, EFS driver in the filesystem stack kicks into action. It recognizes that the file is encrypted and looks for a decryption key. Because there is a private key associated with the same user account– corresponding public key was used to encrypt the directory in the first place– the driver can transparently decrypt that file and return its unprotected contents to the agent. The result is that instead of encrypted files, the original cleartext data will get sent over to the cloud provider.**

Incidentally this transparency is entirely by design. Reading/writing contents of encrypted files works exactly the same as for ordinary files. Same APIs and code paths are invoked from the developer perspective. Imagine the alternative: if there was a different set of APIs involved, every application would have to be rewritten to become compatible with EFS. Pragmatically then nobody could enable EFS, out of fear that some application they use had not been upgraded to become encryption-aware yet. EFS designers made the right call in opting for compatibility. It is an unintended consequence that EFS does not compose directly with popular cloud-storage designs in use today. (Incidentally there are specific APIs to retrieve encrypted contents of a file. While these would have achieved the desired effect of only backing up ciphertext, it requires modifying the synchronization agents to invoke different code paths.)

Next post will look at tricks for combining specific local encryption schemes with arbitrary off-the-shelf cloud storage solutions to achieve the desired privacy property: data stored remotely is not accessible to the cloud provider  regardless of their intentions.

[continued]

CP

** As an aside, lack of encryption is not the only problem.  Even if that could be addressed, there is loss of functionality in that uploaded data would become inaccessible on any other machine or even a fresh install of Windows on the same box. EFS uses public-key pairs that are generated locally on the machine where encryption is first applied. It is not trivial to roam that key to another device. EFS does have a notion of recovery agents to allow decryption when the original key pair is not available, but that heavyweight process would have to be invoked on every new device to recover access. For now we put aside this problem of access from multiple devices, focusing only on privacy in the context of just one device getting backed up and restored.